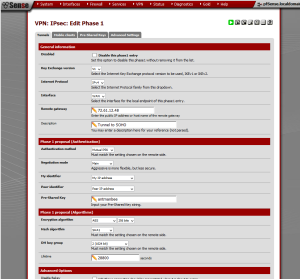
Phase 1 IPsec configuration in pfSense 2.2.4.
In the previous article, we covered how to set up a PPTP VPN connection in pfSense, and how to connect to it in Mint Linux. Since PPTP relies on MS-CHAPv2, which has been compromised, we probably want to use another method if security is paramount. In this article, we will cover setting up an IPsec tunnel with pfSense and connecting to it with Mint Linux.
IPsec VPN Configuration: Phase 1
First we need to set up the IPsec tunnel in pfSense. Navigate to VPN -> IPsec and click on the plus button on on the lower right to add a new tunnel. Under General information, there is an entry for Interface, where we select the interface for the local endpoint of the tunnel. Since our end user will be connecting remotely, the local endpoint should be WAN. The next entry is Remote Gateway, where we enter the IP address or host name of the remote gateway. Enter a brief description and scroll down to the Phase 1 proposal (Authentication) section. At Pre-Shared Key, you need to enter a key (PSK), which will essentially be the tunnel’s password. Whether you alter the Phase 1 proposal (Algorithms) settings or not, take note of the settings, as we will need them for future reference. Press the save button at the bottom to save the Phase 1 configuration. On the next page, press the Apply changes button to commit changes.
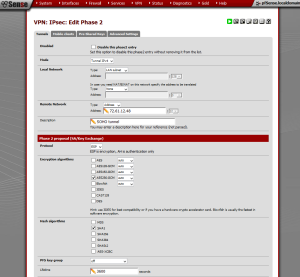
Phase 2 IPsec configuration.
IPsec VPN Configuration: Phase 2
Now there should be a new entry in the IPsec table for the new Phase 1 configuration. Click on the big plus button underneath the entry you just created to initiate Phase 2 configuration. This section should expand, revealing an empty table for Phase 2 settings. Click on the (smaller) plus button to the right of the table to bring up the Phase 2 settings page. For Mode, you can select whichever method you prefer, but note that whoever connects will have to use the same method. For Local Network, enter the network or address to which you want to give the VPN user access (probably LAN net). For Remote Network, enter the address of the remote end of the VPN tunnel. Enter a brief description. In the Phase 2 proposal section (SA/Key Exchange), set the protocol and encryption options, again taking note of them for future reference (AES-256 is the commonly used standard). When you are done, press the Save button at the bottom of the page. Press the Apply changes button on the next page to commit changes. Finally, check the Enable IPsec check box on the main IPsec page and press the Save button.
Now that Phase 1 and Phase 2 configuration are complete, all that remains is to create a firewall rule for IPsec traffic. Navigate to Firewall -> Rules. There should be a new tab for IPsec; click on it. There may already be a rule there allowing traffic to pass to whatever network or address you specified in the Phase 2 configuration. If not, then create one now by pressing the one of the plus buttons on this page. Most of the default settings can be kept, but set Destination to the network or address specified in Local Network in the Phase 2 configuration. For Destination port range, specify any. Add a brief description, and press the Save button. On the next page, press the Apply changes button to commit these changes.
In part two of this article, we will cover connecting to the VPN tunnel from the remote node.
External Links:
pfSense IPsec configuration information from the official pfSense site
The post IPsec VPN Configuration in pfSense: Part One appeared first on pfSense Setup HQ.